Wedding Arch Plans PDF Free: A Comprehensive Guide
Discover readily available, complimentary PDF plans for crafting stunning wedding arches! Resources like My Outdoor Plans, Instructables, and DoityourselfPlanner offer diverse designs for a memorable ceremony.
Embarking on a DIY wedding arch project is a fantastic way to personalize your special day and save on costs. Instead of purchasing a pre-made arch, you can construct a unique structure reflecting your style and theme. Fortunately, numerous free PDF plans are available online, simplifying the building process even for beginners.
These plans provide detailed instructions, material lists, and cutting diagrams, guiding you through each step. Websites like My Outdoor Plans, Instructables, and DoityourselfPlanner are excellent starting points, offering a range of designs from rustic wooden arches to elegant freestanding structures. Utilizing these resources empowers you to create a beautiful focal point for your ceremony without breaking the bank, adding a personal touch to your wedding celebration.
Why Choose a DIY Wedding Arch?
Opting for a DIY wedding arch offers significant advantages beyond cost savings. Pre-made arches often lack personalization, whereas a DIY project allows complete creative control, ensuring it perfectly complements your wedding aesthetic. Free PDF plans democratize this process, making custom designs accessible to all skill levels.
Building your own arch fosters a sense of accomplishment and adds a heartfelt, handmade element to your ceremony. Resources like My Outdoor Plans and Instructables provide the blueprints, while DoityourselfPlanner offers specific designs. This approach also allows for adjustments to size and style, fitting your venue and theme seamlessly. Ultimately, a DIY arch is a unique expression of your love story.
Benefits of Using Free PDF Plans
Free PDF wedding arch plans unlock a world of possibilities without financial strain. These plans, readily available from sources like My Outdoor Plans, Instructables (with SketchUp files!), and DoityourselfPlanner, provide detailed instructions and material lists, streamlining the building process.
They eliminate guesswork, reducing errors and wasted materials. Many plans cater to various skill levels, from beginner-friendly to more complex designs. Accessing these resources online is convenient and allows for easy comparison of styles. Furthermore, free plans encourage experimentation and customization, enabling you to create a truly unique arch. DIY Cricut Wedding Ideas and Tidewater and Tulle also point to valuable resources.

Popular Wedding Arch Styles
Explore diverse arch designs! Options range from rustic wooden structures and classic triangular arbors to circular, freestanding, hexagonal, and octagonal creations for your special day.
Rustic Wooden Arch Designs
Embrace natural beauty with a rustic wooden wedding arch! These designs often utilize readily available lumber like 2x4s and 4x4s, offering a charming, down-to-earth aesthetic. My Outdoor Plans features a fantastic freestanding wedding arch plan perfect for achieving this look.
Consider incorporating natural elements like branches or vines into the structure for added texture. Zing Woodworks provides a 2×4 wedding gate arch design, showcasing a simpler, yet elegant approach. The key to a successful rustic arch lies in highlighting the wood’s grain and imperfections, creating a warm and inviting atmosphere.
Many free PDF plans emphasize straightforward construction techniques, making these arches accessible for DIY enthusiasts of all skill levels. Remember to prioritize stability and proper finishing to ensure a lasting and beautiful focal point for your ceremony.
Triangular Wedding Arbor Plans
Triangular arbors offer a classic and structurally sound choice for wedding ceremonies. DoityourselfPlanner provides free, downloadable plans for a triangle wedding arbor, utilizing 2×4 lumber and readily available wood screws. This design is known for its simplicity and ease of construction, making it ideal for beginner DIYers.
The inherent stability of the triangular shape minimizes the need for extensive bracing, though ensuring a level base is crucial. These plans often detail precise cutting angles and assembly instructions, streamlining the building process.
Consider customizing the triangle’s height and width to suit your venue and personal preferences. A triangular arbor provides a beautiful backdrop for floral arrangements and fabric draping, creating a romantic and picturesque setting.
Circular & Freestanding Arch Options
Freestanding circular arches provide an elegant and versatile option, requiring no permanent installation. My Outdoor Plans features a detailed PDF plan for a freestanding wedding arch, offering a complete guide to construction. These arches typically utilize a curved design, often built with 2×4 lumber to create a sturdy frame.
The benefit of a freestanding design is portability – easily moved and reused for different events. Circular arches lend themselves beautifully to flowing fabrics and abundant floral displays, enhancing the romantic ambiance.
Careful attention to the base construction is vital for stability, especially outdoors. Consider adding weight or securing the arch to prevent tipping in windy conditions.
Hexagonal & Octagonal Arch Structures
For a unique and visually striking statement, hexagonal or octagonal arches offer a departure from traditional designs. While dedicated free PDF plans are less common, the 7-sided wedding arbor plan from Instructables provides a strong foundation for adapting to these shapes.
These structures demand precise angle cuts and careful assembly, often utilizing SketchUp for design visualization. Building with 4×4 posts provides robust support, essential for larger, multi-sided arches.
Consider the complexity of the build; hexagonal and octagonal arches require more lumber and intricate joinery. However, the resulting architectural detail creates a truly memorable wedding backdrop.

Essential Materials & Tools
Successful arch construction requires lumber (2×4, 4×4), screws, bolts, a saw, drill, and level. Proper tools ensure accurate cuts and a stable, beautiful structure!
Lumber Selection (2×4, 4×4)
Choosing the right lumber is crucial for a sturdy and visually appealing wedding arch. Plans frequently utilize 2x4s and 4x4s, offering a balance of strength and workability. DoityourselfPlanner specifically lists needing seven 2x4x96 lumber pieces for their triangle arch design.
Consider the wood type; whitewood studs, like those available at Home Depot, are a common choice. 4x4s are generally used for the upright supports, providing robust stability, while 2x4s can form the framework and crossbeams. Ensure the lumber is straight and free of significant knots or warping.
Pressure-treated lumber is an option for outdoor arches, enhancing resistance to the elements, but consider the aesthetic impact. Always check the plans for specific lumber requirements and adjust quantities accordingly.
Fasteners: Screws & Bolts
Securely fastening your wedding arch components requires appropriate hardware. Most DIY plans recommend using both screws and bolts for optimal strength and longevity. DoityourselfPlanner’s triangle arch plan calls for thirty 2-1/2 inch wood screws. Screws are ideal for joining smaller pieces and creating a flush finish.
Bolts, particularly carriage bolts with washers and nuts, are best suited for connecting larger structural elements like 4×4 posts. They provide a stronger, more durable connection capable of withstanding stress and movement.
Consider using exterior-grade screws and bolts if the arch will be exposed to the weather. Pre-drilling holes can prevent wood splitting and ensure a tighter, more reliable hold.
Tools Required: Saw, Drill, Level

Successfully building a DIY wedding arch demands specific tools for precision and safety. A miter saw, as demonstrated in the Instructables 7-sided arbor build, is crucial for accurate angle cuts on lumber. Alternatively, a circular saw can be used, but requires more skill.
A power drill is essential for pre-drilling holes for screws and bolts, and for driving the fasteners themselves. Ensure you have various drill bit sizes. A level is non-negotiable; it guarantees your arch is plumb and stable, preventing wobbling or collapse.
Additional helpful tools include a measuring tape, a square, and safety glasses.

Free PDF Plan Resources
Explore excellent online sources for free wedding arch plans! My Outdoor Plans, Instructables (with SketchUp files), and DoityourselfPlanner provide detailed guides.
My Outdoor Plans ⎯ Freestanding Wedding Arch
My Outdoor Plans offers a fantastic, free PDF plan for building a beautiful freestanding wedding arch. This design is ideal for backyard ceremonies, providing a sturdy and elegant structure without requiring permanent installation.
The plans are detailed and include a comprehensive materials list, cutting diagrams, and step-by-step instructions, making it accessible for DIY enthusiasts of varying skill levels. You’ll find guidance on assembling the arch frame, ensuring its stability, and preparing it for decoration.
This resource is particularly valuable as it provides a complete blueprint, allowing you to construct a visually appealing arch with confidence. The freestanding nature of the design adds flexibility to your wedding setup, enabling you to position it perfectly for your special day.
Instructables ⎯ 7-Sided Wedding Arbor (SketchUp File)
Instructables presents a unique opportunity to build a captivating 7-sided wedding arbor, complete with a free downloadable SketchUp file! This detailed file allows for precise visualization and modification of the design before construction begins.
The project guide, accompanied by clear photographs, walks you through each step – from accurately cutting 4×4 lumber using a miter saw, to assembling the seven sides. The creator designed the system in Illustrator to achieve a 7-foot diameter, offering a spacious and impressive structure.
Leveraging the SketchUp file empowers you to customize dimensions and adapt the arbor to your specific needs. This resource is perfect for those comfortable with digital design and seeking a slightly more complex, visually striking arch.
DoityourselfPlanner ⎯ Triangle Wedding Arbor Plans
DoityourselfPlanner provides accessible, free plans for constructing a classic triangle wedding arbor – a popular choice for its simplicity and elegance. These plans detail a straightforward build, perfect for beginner DIY enthusiasts.
The provided shopping list streamlines material acquisition, specifying quantities needed. It calls for seven 2x4x96 lumber pieces (available at Home Depot) and thirty 2-1/2 inch wood screws for secure assembly.
These plans offer a cost-effective solution for creating a beautiful ceremony backdrop. The triangular design is inherently stable and easily customizable with floral arrangements or fabric draping. This resource is ideal for those seeking a quick, budget-friendly, and visually appealing wedding arch option.

Step-by-Step Construction Guide (General)
Begin by precisely cutting lumber to the specified dimensions in your chosen plan. Then, assemble the arch frame, prioritizing stability and ensuring perfect leveling throughout the process.
Cutting Lumber to Size
Accurate lumber cuts are foundational to a structurally sound and aesthetically pleasing wedding arch. Begin by carefully reviewing your chosen PDF plan, noting all required lumber lengths for both vertical and horizontal supports. Utilize a miter saw for precise angled cuts, especially crucial for triangular or heptagonal designs, as highlighted in the Instructables 7-sided arbor guide.
Double-check measurements before each cut, accounting for the saw blade’s kerf (width of the cut). For projects utilizing 4x4s, like the Instructables arbor, precise cuts are paramount. When working with 2x4s, as seen in the DoityourselfPlanner triangle arch, consistent lengths ensure a square and stable frame. Label each piece immediately after cutting to avoid confusion during assembly, streamlining the building process and minimizing errors.
Assembling the Arch Frame
With lumber accurately cut, begin assembling the arch frame according to your chosen PDF plan. Utilize appropriate fasteners – screws and bolts – ensuring secure connections. Start by joining the vertical supports to the base, referencing the My Outdoor Plans freestanding arch for guidance on creating a stable foundation.
Progress to connecting the horizontal pieces, maintaining square angles. Pre-drilling pilot holes prevents wood splitting, particularly with 4×4 lumber. For complex designs like the 7-sided arbor from Instructables, methodical assembly is key. Regularly check for levelness and adjust as needed. Tighten all fasteners firmly, but avoid over-tightening, which can strip screws or damage the wood.

Ensuring Stability & Leveling
A stable and level arch is paramount for safety and aesthetics. Begin by verifying the base is on a firm, even surface. Utilize a level to check both vertical and horizontal components during assembly, referencing the plans from DoityourselfPlanner for triangle arch specifics.
For freestanding arches, like those from My Outdoor Plans, consider adding bracing or weighted bases to resist tipping, especially in windy conditions. Regularly reassess levelness as you add decorative elements. If adjustments are needed, use shims under the base or carefully tighten/loosen fasteners. A wobbly arch poses a safety risk, so prioritize a solid, balanced structure.
Decorating Your Wedding Arch
Transform your DIY arch with florals, fabrics, and lights! Enhance the structure with greenery, ribbons, or fairy lights for a personalized, romantic touch.
Floral Arrangements & Greenery
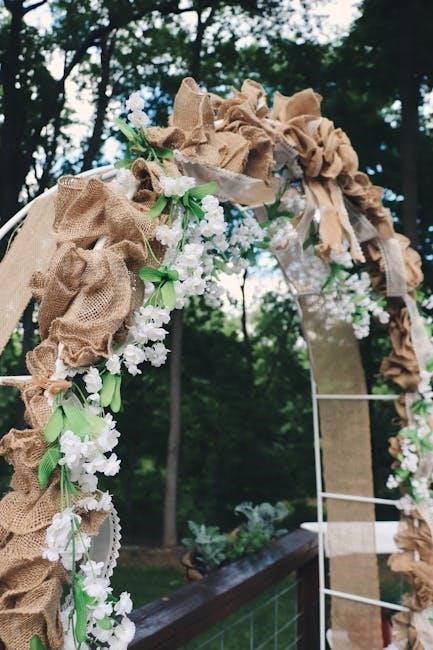
Elevate your wedding arch with breathtaking floral arrangements and lush greenery. Consider cascading bouquets featuring roses, hydrangeas, and baby’s breath for a classic, romantic aesthetic. Alternatively, embrace a bohemian vibe with wildflowers, pampas grass, and eucalyptus.
When selecting flowers, coordinate colors with your wedding theme. Greenery, such as ivy or ferns, adds texture and fullness, beautifully complementing the floral displays. Secure arrangements using floral foam or wire, ensuring they are firmly attached to the arch structure.
Don’t be afraid to experiment with asymmetrical designs or incorporate seasonal blooms. A touch of greenery woven throughout the arch frame creates a natural, inviting ambiance. Remember to consider the weight of the arrangements to maintain arch stability.
Draping Fabrics & Ribbons
Transform your wedding arch into a romantic masterpiece with flowing fabrics and delicate ribbons. Sheer chiffon, elegant satin, or rustic burlap can dramatically alter the arch’s aesthetic. Consider the overall wedding style when choosing materials – lace for vintage, silk for luxury, or cotton for a relaxed vibe.
Drape fabrics loosely for a soft, ethereal look, or create more structured designs with careful folds and pleats. Ribbons in complementary colors can be tied around the arch frame, adding texture and visual interest. Experiment with different draping techniques to achieve your desired effect.
Secure fabrics with floral wire or adhesive clips, ensuring they remain in place throughout the ceremony. Remember to consider fabric weight and wind conditions for optimal stability.
Adding Lighting (Fairy Lights, Lanterns)
Elevate your wedding arch’s ambiance with enchanting lighting options. Delicate fairy lights woven through floral arrangements or draped around the structure create a magical, romantic glow, especially for evening ceremonies. Battery-operated LED lights offer convenience and safety, eliminating the need for nearby outlets.
Consider incorporating lanterns of varying sizes and styles – rustic metal lanterns for a bohemian vibe, or elegant glass lanterns for a more formal setting. Ensure lanterns are securely attached to prevent accidents.
Strategically placed spotlights can highlight specific features of the arch, such as floral arrangements or draping fabrics. Remember to test the lighting setup beforehand to achieve the desired effect.
Safety Considerations
Prioritize safety when building and installing your arch! Use power tools responsibly, handle lumber carefully, and ensure the structure is stable and wind-resistant.
Working with Power Tools
Employing power tools demands strict adherence to safety protocols. Always wear appropriate personal protective equipment (PPE), including safety glasses, hearing protection, and a dust mask. Before operating any saw or drill, thoroughly read and understand the manufacturer’s instructions.
Ensure the work area is well-lit and free of obstructions. Secure the lumber firmly before cutting or drilling to prevent movement and potential injury. Never remove safety guards from power tools. Disconnect power tools when changing blades or bits.
Be mindful of cord placement to avoid tripping hazards. If you are unfamiliar with a particular tool, seek guidance from an experienced user. Prioritize a controlled and deliberate approach to each cut and drill, avoiding rushing or distractions. Remember, safety is paramount throughout the entire construction process.
Proper Lumber Handling
Handling lumber safely is crucial for both personal well-being and project quality. Always lift with your legs, keeping your back straight, and avoid twisting motions. When working with longer pieces of lumber, enlist assistance to prevent strain or loss of control.
Inspect lumber for defects like knots or splits before cutting. Store lumber in a dry, level area to prevent warping or damage. Be aware of the weight of the lumber – 2x4s and 4x4s can be surprisingly heavy!
When transporting lumber, secure it properly to prevent shifting during travel. Avoid dropping or dragging lumber, as this can cause splinters or damage the wood. Wear work gloves to protect your hands from splinters and rough edges.
Arch Stability & Wind Resistance
Ensuring your wedding arch remains stable, especially outdoors, is paramount for safety. Thoroughly assess the ground conditions where the arch will stand; uneven terrain requires leveling. Secure the base of the arch using ground anchors or weights, particularly for freestanding designs.
Consider wind resistance when choosing a design. A wider base and a lower profile generally offer greater stability. Reinforce joints with robust fasteners – screws and bolts are preferable to nails.
Regularly inspect the arch for any signs of loosening or instability. Do not use the arch in excessively windy conditions. A well-constructed and properly secured arch will provide a beautiful and safe focal point for your special day.
Finding More Free Plans Online
Expand your search using Pinterest, wedding DIY blogs, and online forums! Discover unique arch styles and connect with builders for inspiration and plans.
Pinterest & Wedding DIY Blogs
Pinterest serves as a visual treasure trove for wedding arch inspiration, brimming with links to free plans and detailed tutorials. Searching keywords like “DIY wedding arch plans PDF” or “free arbor plans” will yield a wealth of results, showcasing various styles from rustic to modern.
Wedding DIY blogs, such as Tidewater and Tulle, frequently feature step-by-step guides and links to downloadable plans. These blogs often highlight specific projects, like freestanding arches from My Outdoor Plans or gate arches from Zing Woodworks, providing photos and helpful tips.
Remember to carefully review the plans before starting, ensuring they align with your skill level and desired aesthetic. Many bloggers also offer beginner-friendly building plans for easier construction.
Online Forums & Communities
Online forums dedicated to woodworking, DIY projects, and wedding planning are invaluable resources for finding free wedding arch plans. These communities often host threads where members share their own designs, modifications, and downloadable PDFs. Engaging with experienced builders can provide personalized advice and troubleshooting assistance.
Reddit’s r/DIY and similar subreddits frequently feature wedding-related projects, including arch construction. Instructables also fosters a collaborative environment where users upload detailed instructions and SketchUp files, like the 7-sided arbor plan, allowing for customization.
Don’t hesitate to ask questions and share your progress – the collective knowledge within these communities is incredibly helpful!
Searching for Specific Arch Styles
Refine your online search by specifying the desired arch style alongside “free PDF plans.” For example, try “rustic wooden arch plans PDF free,” “triangular wedding arbor plans PDF,” or “hexagonal arch plans free download.” This targeted approach yields more relevant results.
Pinterest is a visual goldmine; use keywords like “DIY wedding arch” and filter for pins linking to downloadable plans. Wedding DIY blogs, such as Modern Planning Tips and Tidewater and Tulle, often curate lists of free resources, including links to plans from sites like My Outdoor Plans and DoityourselfPlanner.
Remember to preview the plans before committing to a build!
Customizing Your Arch Plan
Adapt free PDF plans to perfectly suit your venue and wedding theme! Adjust dimensions, modify designs, and add personal touches for a unique arch.
Adjusting Dimensions for Your Space
Carefully assess your ceremony location before committing to dimensions found in free PDF wedding arch plans. Consider the available width and height, ensuring the arch doesn’t overwhelm the space or obstruct pathways.
Scaling plans is often necessary. If a plan calls for a 7-foot diameter arbor, but your garden is smaller, proportionally reduce all measurements. Remember to recalculate lumber quantities accordingly! Conversely, larger venues may benefit from a more substantial arch.
Utilize online tools or graph paper to visualize the adjusted arch within your space. Prioritize a balanced aesthetic – the arch should complement, not dominate, the surroundings. Don’t hesitate to modify height and width independently to achieve the perfect fit.
Modifying the Design to Match Your Theme
Free PDF wedding arch plans offer a fantastic starting point, but personalization is key to reflecting your unique wedding theme. A rustic theme benefits from incorporating reclaimed wood or branches into the design, altering the plan’s lumber choices.
For a modern aesthetic, simplify the structure, perhaps opting for a sleek, geometric shape instead of a traditional arch. Consider adding unique design elements like asymmetrical angles or integrated geometric patterns.
Don’t be afraid to change the overall shape – a triangular arbor can become hexagonal with careful adjustments. Remember to maintain structural integrity when modifying plans, and always prioritize safety.
Adding Personal Touches
Beyond structural modifications, personalize your DIY wedding arch with details that reflect your love story. Incorporate monograms, carved initials, or meaningful dates into the wood itself for a lasting keepsake. Consider painting or staining the arch in your wedding colors, complementing your overall décor.

Unique embellishments like hand-painted designs, mosaic tiles, or repurposed materials can elevate the arch’s aesthetic; Think about adding custom-built shelves or niches to display photos or small mementos.
Don’t underestimate the power of texture! Wrap the legs with twine, burlap, or lace for a rustic or bohemian vibe. These small details transform a standard arch into a truly personal statement.